Recyclerview in android is used to display the large amount of data in list form. It is the flexible and easy form to show the huge list of dynamic data into list or grid form in android devices.
Recyclerview loads only the data which is currently shown on screen for any particular object from the dynamic list in android. When we scroll the screen the view remains the same it loads only the next data from the list queue.
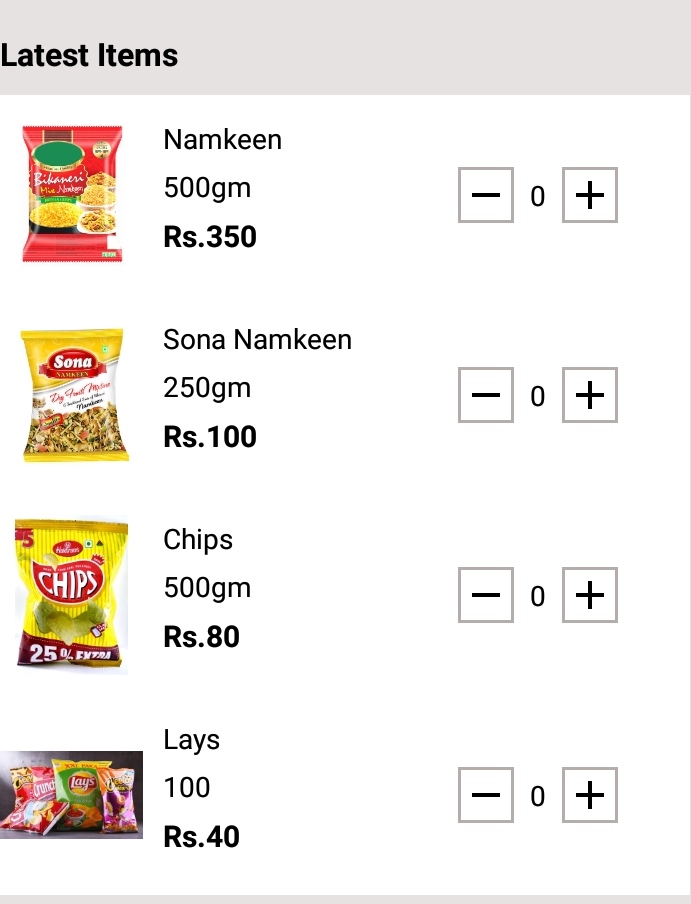
You can see in the above screenshot, I showed items in a recyclerview form.
Why do we use RecyclerView in android?
Recyclerview in android improves the performance of the app because when we use the listview it loads all the data that is available in the list. Hence it causes the hanging issues of the application. You could in many applications the ANR ( Application not responding) issue. So developers are using recyclerview. It loads the data in view which is available on the current from the list.
Enable DataBinding in Androiod
Before starting this example I want to show that I used dataBinding in this tutorial. DataBinding in android is the way to easily access the id of any widget and also it reduces the code length and development process. So I recommend enabling dataBinding in android. This is an easy process. It will take only 10 minutes to learn please see this tutorial to enable dataBinding in android.
Steps for Using RecyclerView in Android
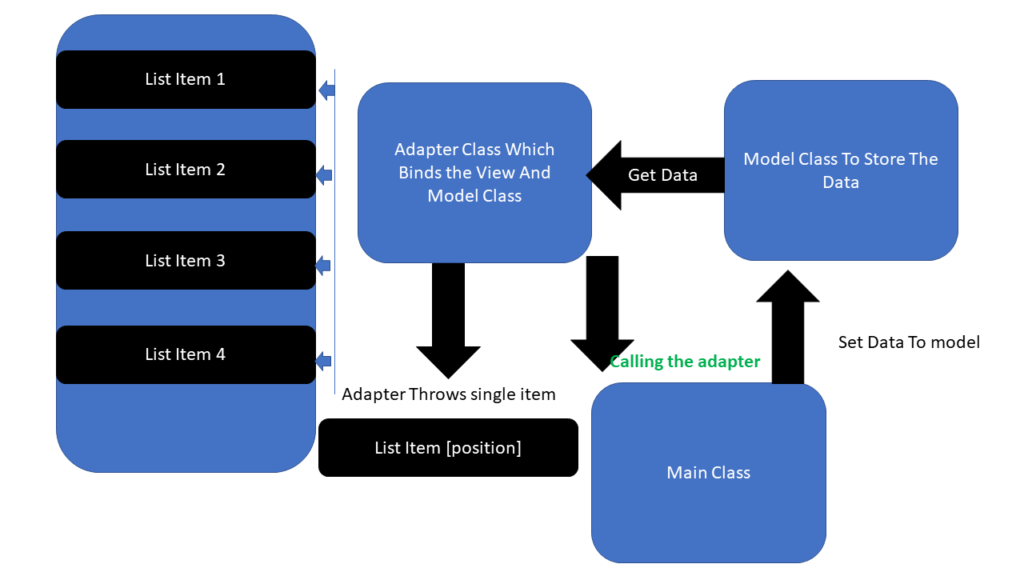
In the above image I tried to teach you how the recyclerview actually works in android.
We use the following classes and components to create a recyclerview.
- single_item_layout
- Adapter class
- Model class
- Main class
item layout
Item layout is the layout for every single row for the view of data. It can be called a view. We create an item_layout file view to show the list data in recyclerview. It remains the same when we scroll the recyclerview screen only the data loads from the next position.
Model class
Model class in android used to store the data locally or dynamically. Create constructor or getter and setter methods to set and get the data from this model from anywhere.
Adapter Class in Android
Adapter class in android is a bridge between model class item layout. It takes the data from the model class and sets it to the item view. It throws the item view after the data set into it when we call the adapter from where.
RecyclerView Dependency In Android Studio
Add following dependency in your build.gradle in android.
implementation “androidx.recyclerview:recyclerview:1.2.1”
Add Internet Permission in Manifests File
Don’t forgot to add internet permission in android Manifests file.
<uses-permission android:name="android.permission.INTERNET" />
Recyclerview in Android Full Example
We will use the following class. I named these according to me. You can change it if you want but carefully while changing the name.
- item_home_latest_items.xml
- LatestItemAdapter.java
- LatestItemModel.java
- HomeFragment.java
LatestItemModel.java
This is the model class which stores the data. I am setting the data from the HomeFragment.java class using its constructor. You can set the dynamic data loaded from the API For this convert the json data and set it to Model’s list object.
To fetch the data override the getter and setter methods. No need to create a constructor if you are setting data into its list object.
package com.example.androidtestingproject.Model;

import com.google.gson.annotations.SerializedName;

public class LatestItemModel {
    @SerializedName("productImage") private String productImage;
    @SerializedName("productName") private String productName;
    @SerializedName("productQuantity") private String productQuantity;
    @SerializedName("productPrice") private String productPrice;

    public LatestItemModel(String productImage, String productName, String productQuantity, String productPrice) {
        this.productImage = productImage;
        this.productName = productName;
        this.productQuantity = productQuantity;
        this.productPrice = productPrice;
    }

    public String getProductImage() {
        return productImage;
    }

    public void setProductImage(String productImage) {
        this.productImage = productImage;
    }

    public String getProductName() {
        return productName;
    }

    public void setProductName(String productName) {
        this.productName = productName;
    }

    public String getProductQuantity() {
        return productQuantity;
    }

    public void setProductQuantity(String productQuantity) {
        this.productQuantity = productQuantity;
    }

    public String getProductPrice() {
        return productPrice;
    }

    public void setProductPrice(String productPrice) {
        this.productPrice = productPrice;
    }
}
item_home_latest_items.xml
item layout is the view of every data which will be shown in the list form but actually in recyclerview. This is an xml layout file. It will be used inside the Adapter class to bind the Data with UI elements.
<?xml version="1.0" encoding="utf-8"?>
<layout xmlns:app="http://schemas.android.com/apk/res-auto"
    xmlns:android="http://schemas.android.com/apk/res/android">

    <androidx.appcompat.widget.LinearLayoutCompat
        android:layout_width="match_parent"
        android:layout_height="100dp"
        android:orientation="horizontal"
        android:background="@color/white"
        android:padding="10dp"
        android:layout_marginRight="5dp">

        <ImageView
            android:id="@+id/productImage"
            android:layout_width="match_parent"
            android:layout_height="match_parent"
            android:layout_weight="1.3"
            android:src="@drawable/cartphoto"/>

        <androidx.appcompat.widget.LinearLayoutCompat
            android:id="@+id/layoutProductText"
            android:layout_width="match_parent"
            android:layout_height="match_parent"
            android:layout_weight="1"
            android:paddingLeft="10dp"
            android:paddingTop="2dp"
            android:orientation="vertical">

            <TextView
                android:id="@+id/productTitle"
                android:layout_width="wrap_content"
                android:layout_height="wrap_content"
                android:text="Namkeen"
                android:textColor="@color/black"
                android:textSize="14dp"/>

            <TextView
                android:id="@+id/productQuantity"
                android:layout_width="wrap_content"
                android:layout_height="wrap_content"
                android:layout_marginTop="5dp"
                android:text="500 gm"
                android:textColor="@color/black"
                android:textSize="14dp"/>

            <TextView
                android:id="@+id/productPrice"
                android:layout_width="wrap_content"
                android:layout_height="wrap_content"
                android:layout_marginTop="5dp"
                android:text="Rs.300"
                android:textColor="@color/black"
                android:layout_gravity="bottom"
                android:gravity="bottom"
                android:textStyle="bold"
                android:textSize="15dp"/>

        </androidx.appcompat.widget.LinearLayoutCompat>

        <RelativeLayout
            android:layout_width="match_parent"
            android:layout_height="match_parent"
            android:layout_weight="1"
            android:gravity="center"
            android:orientation="horizontal">

            <LinearLayout
                android:layout_width="wrap_content"
                android:layout_height="wrap_content"
                android:layout_centerInParent="true"
                android:orientation="horizontal">


                <ImageView
                    android:id="@+id/imgProductRemove"
                    android:layout_width="wrap_content"
                    android:layout_height="wrap_content"
                    android:padding="2dp"
                    android:layout_gravity="center"
                    android:src="@drawable/ic_remove"
                    android:background="@drawable/rect_box_product_number"
                    app:tint="@color/black" />

                <TextView
                    android:id="@+id/textProductNumber"
                    android:layout_width="wrap_content"
                    android:layout_height="wrap_content"
                    android:layout_gravity="center"
                    android:layout_margin="8dp"
                    android:text="2"
                    android:textColor="@color/black"
                    android:textSize="14dp" />

                <ImageView
                    android:id="@+id/imgProductAdd"
                    android:layout_width="wrap_content"
                    android:layout_height="wrap_content"
                    android:layout_gravity="center"
                    android:padding="2dp"
                    android:src="@drawable/ic_add"
                    android:background="@drawable/rect_box_product_number"
                    app:tint="@color/black" />

            </LinearLayout>

        </RelativeLayout>

    </androidx.appcompat.widget.LinearLayoutCompat>

</layout>
LatestItemAdapter.java Adapter class in RecyclerView in android
The Adapter class is used to bind the UI elements to data sources from the Model class.
Methods used in RecyclerView Adapter In android are below-
Some RecyclerView methods are used like below-
- extends it to Recycler.Adapter<YourAdapter.myViewHolder)
- implement onCreateViewHolder()
- implement onBindViewHolder()
- getItemCount()
- myViewHolder extends RecyclerView.ViewHolder
- Create myViewHolder class constructor
You can see all the above methods and classes in the Adapter class. To fetch ids i used dataBinding. Create Model’s List<> type variable and also a context. Create its parent class constructor also.
package com.example.androidtestingproject.Adapters;

import android.content.Context;
import android.content.Intent;
import android.util.Log;
import android.view.LayoutInflater;
import android.view.View;
import android.view.ViewGroup;

import androidx.annotation.NonNull;
import androidx.databinding.DataBindingUtil;
import androidx.recyclerview.widget.RecyclerView;

import com.bumptech.glide.Glide;
import com.example.androidtestingproject.Activity.ProductDetailsActivity;
import com.example.androidtestingproject.Model.LatestItemModel;
import com.example.androidtestingproject.R;
import com.example.androidtestingproject.databinding.ItemHomeLatestItemsBinding;

import java.util.List;

public class LatestItemAdapter extends RecyclerView.Adapter<LatestItemAdapter.myViewHolder> {
    private Context context;
    private List<LatestItemModel> data;
    private int productSelectedNumber = 0;

    public LatestItemAdapter(Context context, List<LatestItemModel> data) {
        this.context = context;
        this.data = data;
    }

    @NonNull
    @Override
    public myViewHolder onCreateViewHolder(@NonNull ViewGroup parent, int viewType) {
        ItemHomeLatestItemsBinding binding = DataBindingUtil.inflate(LayoutInflater.from(context), R.layout.item_home_latest_items, parent, false);
        return new myViewHolder(binding);
    }

    @Override
    public void onBindViewHolder(@NonNull myViewHolder holder, int position) {
        LatestItemModel model = data.get(position);

        Glide.with(context).load(model.getProductImage()).into(holder.binding.productImage);
        holder.binding.productTitle.setText(model.getProductName());
        holder.binding.productQuantity.setText(model.getProductQuantity());
        holder.binding.productPrice.setText(model.getProductPrice());
        holder.binding.textProductNumber.setText(String.valueOf(productSelectedNumber));

        if (productSelectedNumber == 0){
            holder.binding.imgProductRemove.setEnabled(false);
        }else{
            holder.binding.imgProductRemove.setEnabled(true);

        }
        holder.binding.imgProductAdd.setOnClickListener(new View.OnClickListener() {
            @Override
            public void onClick(View v) {
                    holder.binding.imgProductRemove.setEnabled(true);
                    productSelectedNumber += 1;
                    holder.binding.textProductNumber.setText(String.valueOf(productSelectedNumber));
            }
        });

        holder.binding.imgProductRemove.setOnClickListener(new View.OnClickListener() {
            @Override
            public void onClick(View v) {
                if (productSelectedNumber != 0){
                    productSelectedNumber = productSelectedNumber - 1;
                    holder.binding.textProductNumber.setText(String.valueOf(productSelectedNumber));
                    notifyDataSetChanged();
                    Log.e("isMethodCalled" , "yes");
                }
            }
        });

        holder.binding.layoutProductText.setOnClickListener(new View.OnClickListener() {
            @Override
            public void onClick(View v) {
                context.startActivity(new Intent(context, ProductDetailsActivity.class));
            }
        });
    }

    @Override
    public int getItemCount() {
        return data.size();
    }

    public class myViewHolder extends RecyclerView.ViewHolder {
        private ItemHomeLatestItemsBinding binding;

        public myViewHolder(ItemHomeLatestItemsBinding binding) {
            super(binding.getRoot());
            this.binding = binding;
        }
    }
}
HomeFragment.java
In this java class I created the List type object of the Model class and initialized it by new ArrayList(). Also created the object of Adapter class.
Please note that i used static data to set into the Model class( LatestItemModel.java ), you can fetch the data from API server and assign it to the Model’s List type object by converting from json format.
I created a method for easy development. Which is as below-
private void setDataToLatestRecycler(List<LatestItemModel> latestItemModelList) {
    latestItemAdapter = new LatestItemAdapter(getActivity(), latestItemModelList);
    RecyclerView.LayoutManager layoutManager = new LinearLayoutManager(getActivity(), LinearLayoutManager.VERTICAL, false);
    binding.recyclerviewHomeLatestItems.setLayoutManager(layoutManager);
    binding.recyclerviewHomeLatestItems.setItemAnimator(new DefaultItemAnimator());
    binding.recyclerviewHomeLatestItems.setAdapter(latestItemAdapter);
}
In the above method i passed the Model’s list type object and passed to the Adapter class. To define the scrollview either Horizontal or Vertical we used the LinearLayoutManager class as in the code. Use setItemAnimator () for easy animation. After all these things call the setAdapter() method using the RecyclerView id by passing the Adapter’s object.
package com.example.androidtestingproject.Fragment;

import android.app.AlertDialog;
import android.content.DialogInterface;
import android.content.Intent;
import android.os.Bundle;

import androidx.databinding.DataBindingUtil;
import androidx.fragment.app.Fragment;
import androidx.recyclerview.widget.DefaultItemAnimator;
import androidx.recyclerview.widget.LinearLayoutManager;
import androidx.recyclerview.widget.RecyclerView;

import android.view.LayoutInflater;
import android.view.View;
import android.view.ViewGroup;

import com.example.androidtestingproject.Activity.MainActivity;
import com.example.androidtestingproject.Adapters.LatestItemAdapter;
import com.example.androidtestingproject.Model.LatestItemModel;
import com.example.androidtestingproject.R;
import com.example.androidtestingproject.databinding.FragmentHomeBinding;
import com.smarteist.autoimageslider.IndicatorView.animation.type.IndicatorAnimationType;

import java.util.ArrayList;
import java.util.List;

public class HomeFragment extends Fragment {
    private FragmentHomeBinding binding;
    private View view;

    private List<LatestItemModel> latestItemModelList;
    private LatestItemAdapter latestItemAdapter;

    @Override
    public View onCreateView(LayoutInflater inflater, ViewGroup container,
                             Bundle savedInstanceState) {
        // Inflate the layout for this fragment
        binding = DataBindingUtil.inflate(inflater, R.layout.fragment_home, container, false);

        view = binding.getRoot();
        initView();
        return view;
    }

    private void initView() {
        latestItemModelList = new ArrayList<>();
        setLatestItem();

    }
//set data to model class
    private void setLatestItem() {
        LatestItemModel model = new LatestItemModel(
                "https://5.imimg.com/data5/NJ/DW/YW/SELLER-8673553/namkeen-packaging-pouch-500x500.jpg",
                "Namkeen", "500gm", "Rs.350");
        latestItemModelList.add(model);

        LatestItemModel model2 = new LatestItemModel(
                "https://5.imimg.com/data5/AV/FR/QL/SELLER-9988068/laminated-namkeen-packaging-packet-500x500.jpg",
                "Sona Namkeen", "250gm", "Rs.100");
        latestItemModelList.add(model2);

        LatestItemModel model3 = new LatestItemModel(
                "https://thumbs.dreamstime.com/b/new-delhi-india-november-packets-chips-indian-brand-haldirams-packaged-food-182551372.jpg",
                "Chips", "500gm", "Rs.80");
        latestItemModelList.add(model3);

        LatestItemModel model4 = new LatestItemModel(
                "https://thumbs.dreamstime.com/b/packets-popular-brands-snack-food-poznan-poland-jun-packets-popular-brands-snack-food-including-lays-crunchips-120285289.jpg",
                "Lays", "100", "Rs.40");
        latestItemModelList.add(model4);

        LatestItemModel model5 = new LatestItemModel(
                "https://imagesvc.meredithcorp.io/v3/mm/image?url=https%3A%2F%2Fstatic.onecms.io%2Fwp-content%2Fuploads%2Fsites%2F38%2F2015%2F06%2F12233316%2FMichael-Angelo-Meal-Starter-Chicken-Bruschetta.jpg",
                "Chicken Masala", "500gm", "Rs.400");
        latestItemModelList.add(model5);

        LatestItemModel model6 = new LatestItemModel(
                "https://vinayakfoodsgroup.com/indian-ready-to-eat/wp-content/uploads/2019/07/delicious-healthy-breakfast2-4.jpg",
                "Dry Food", "500gm", "Rs.550");
        latestItemModelList.add(model6);
        setDataToLatestRecycler(latestItemModelList);
    }

    private void setDataToLatestRecycler(List<LatestItemModel> latestItemModelList) {
        latestItemAdapter = new LatestItemAdapter(getActivity(), latestItemModelList);
        RecyclerView.LayoutManager layoutManager = new LinearLayoutManager(getActivity(), LinearLayoutManager.VERTICAL, false);
        binding.recyclerviewHomeLatestItems.setLayoutManager(layoutManager);
        binding.recyclerviewHomeLatestItems.setItemAnimator(new DefaultItemAnimator());
        binding.recyclerviewHomeLatestItems.setAdapter(latestItemAdapter);
    }
}
fragment_home.xml
Use the RecyclerView widget in the xml file.
<?xml version="1.0" encoding="utf-8"?>
<layout xmlns:android="http://schemas.android.com/apk/res/android"
    xmlns:app="http://schemas.android.com/apk/res-auto"
    xmlns:tools="http://schemas.android.com/tools">

    <LinearLayout
        android:layout_width="match_parent"
        android:layout_height="match_parent"
        android:background="@color/lightGrey"
        android:orientation="vertical"
        tools:context=".Fragment.HomeFragment">

        <TextView
            android:id="@+id/textHome"
            android:layout_width="wrap_content"
            android:layout_height="wrap_content"
            android:layout_margin="10dp"
            android:text="Latest Items"
            android:textColor="@color/black"
            android:textSize="16dp"
            android:textStyle="bold" />

        <androidx.recyclerview.widget.RecyclerView
            android:id="@+id/recyclerviewHomeLatestItems"
            android:layout_width="match_parent"
            android:layout_height="wrap_content" />

    </LinearLayout>

</layout>
Conclusion Of RecyclerView in Andoid Example
Please visit more android and flutter tutorials which will improve your development skills. Also see DataBinding in android.